In English (Google) at the bottom, but here the updated post for the 16.04
La guida aggiornata per Ubuntu 16.04 la trovate qua.
Il mio precedente articolo, risalente ormai a due anni fa, su come installare una interfaccia grafica (GUI) ad Ubuntu Server ha avuto un più che discreto successo con le sue 3850 visualizzazioni.
Ho pensato che fosse il caso di aggiornare il post con la nuovissima Ubuntu 14.04.
Il progresso è il progresso e sulla nuova distribuzione server di casa Canonical installare una interfaccia grafica è senz'altro più semplice di due anni fa.
Ora, prima di tutto una premessa doverosa: un Server con Interfaccia grafica è quasi sempre inutile e dannoso e, autocitandomi: 'sono ben poche le circostanze che la rendono davvero necessaria. Vale il vecchio adagio: "Quello che non c'è non si rompe" che, nell'Informatica, ha anche un corollario mica da poco: "quello che non c'è non può essere violato".'
Il procedimento che segue potrebbe essere utile per costruire una macchina Desktop con interfaccia particolarmente leggera e dotata solo del software strettamente necessario oppure per un Server che oltre a fare da Server configurato come si deve debba anche, che so, per motivi economici, fungere da Workstation.
Per prima cosa, quindi, installate Ubuntu 14.04 server aggiungendo come ruolo solo quello di server ssh, nel caso abbiate altre necessità, ovviamente, aggiungete, quando l'installer ve lo richiede, tutti i ruoli necessari.
Dopo l'installazione logghiamoci sul server con le nostre credenziali, aggiorniamo il server:
sudo apt-get update
e, dopo che l'elenco del software disponibile si è aggiornato lanciamo il vero e proprio programma di aggiornamento:
sudo apt-get dist-upgrade
La via più rapida ad una Graphical User Interface passa per l'installazione di uno dei numerosi ambienti grafici disponibili: Unity, KDE, XFCE LXDE.
Per far ciò lanciamo un solo semplice comando:
sudo tasksel
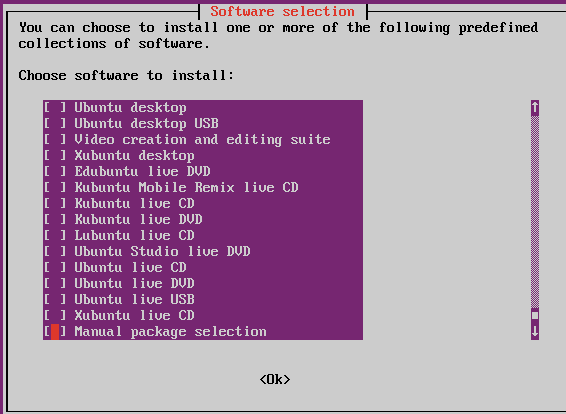
inserendo la password. Comparirà questa schermata:

La guida aggiornata per Ubuntu 16.04 la trovate qua.
Il mio precedente articolo, risalente ormai a due anni fa, su come installare una interfaccia grafica (GUI) ad Ubuntu Server ha avuto un più che discreto successo con le sue 3850 visualizzazioni.
Ho pensato che fosse il caso di aggiornare il post con la nuovissima Ubuntu 14.04.
Il progresso è il progresso e sulla nuova distribuzione server di casa Canonical installare una interfaccia grafica è senz'altro più semplice di due anni fa.
Ora, prima di tutto una premessa doverosa: un Server con Interfaccia grafica è quasi sempre inutile e dannoso e, autocitandomi: 'sono ben poche le circostanze che la rendono davvero necessaria. Vale il vecchio adagio: "Quello che non c'è non si rompe" che, nell'Informatica, ha anche un corollario mica da poco: "quello che non c'è non può essere violato".'
Il procedimento che segue potrebbe essere utile per costruire una macchina Desktop con interfaccia particolarmente leggera e dotata solo del software strettamente necessario oppure per un Server che oltre a fare da Server configurato come si deve debba anche, che so, per motivi economici, fungere da Workstation.
Per prima cosa, quindi, installate Ubuntu 14.04 server aggiungendo come ruolo solo quello di server ssh, nel caso abbiate altre necessità, ovviamente, aggiungete, quando l'installer ve lo richiede, tutti i ruoli necessari.
Dopo l'installazione logghiamoci sul server con le nostre credenziali, aggiorniamo il server:
sudo apt-get update
e, dopo che l'elenco del software disponibile si è aggiornato lanciamo il vero e proprio programma di aggiornamento:
sudo apt-get dist-upgrade
La via più rapida ad una Graphical User Interface passa per l'installazione di uno dei numerosi ambienti grafici disponibili: Unity, KDE, XFCE LXDE.
Per far ciò lanciamo un solo semplice comando:
sudo tasksel
inserendo la password. Comparirà questa schermata:
Selezioniamo l'ambiente desktop che preferiamo con freccette e barra spaziatrice e premiamo invio.
Io, per il mio test, ho scelto Lubuntu nella versione minima.
Il gioco è fatto: inizierà il download e l'installazione del software:

Dopo pochi minuti, a seconda della potenza dell'hardware, della velocità della connessione ad internet e dell'ambiente desktop scelto, una volta conclusa l'installazione potremo riavviare e ritrovarci a fare login in un ambiente grafico.


Io, per il mio test, ho scelto Lubuntu nella versione minima.
Il gioco è fatto: inizierà il download e l'installazione del software:
Dopo pochi minuti, a seconda della potenza dell'hardware, della velocità della connessione ad internet e dell'ambiente desktop scelto, una volta conclusa l'installazione potremo riavviare e ritrovarci a fare login in un ambiente grafico.
Ed ecco qui sopra un server ubuntu 14.04 con interfaccia grafica e, appunto, kernel server.
Tuttavia, il mio ambiente desktop preferito in questi tempi è MATE:
è leggerissimo, completo, non richiede accelerazione 3d ed è altamente customizzabile.
Per installare MATE 1.8, quindi, dovremo digitare nel terminale quanto segue:
Tuttavia, il mio ambiente desktop preferito in questi tempi è MATE:
è leggerissimo, completo, non richiede accelerazione 3d ed è altamente customizzabile.
Per installare MATE 1.8, quindi, dovremo digitare nel terminale quanto segue:
sudo -s (e inserire la password)
echo "deb http://repo.mate-desktop.org/archive/1.8/ubuntu $(lsb_release -cs) main" | sudo tee /etc/apt/sources.list.d/mate-desktop.list
wget -qO - http://mirror1.mate-desktop.org/debian/mate-archive-keyring.gpg | sudo apt-key add -
apt-get update
e, a seconda della quantità di pacchetti aggiuntivi che si desidera installare, si potrà o meno aggiungere mate-desktop-environment e mate-desktop-environment-extra al comando di installazione:
apt-get install xinit slim mate-core mate-desktop-environment mate-desktop-environment-extra mate-notification-daemon

E', ovviamente, necessaria una gran quantità di software, quindi non vi allarmate per le dimensioni del download nè per l'alert sui pacchetti non firmati.

Quando l'installazione finisce è opportuno riavviare con il comando
reboot
Subito dopo il riavvio ci ritroveremo la solita scheramta testuale di login, se abbiamo installato MATE su una Ubuntu Server liscia, altrimenti, se abbiamo installato MATE su una Ubuntu Server già dotata di Lubuntu, per esempio, i passaggi successivi non sono necessari e si deve avere solo l'accortezza di selezionare MATE come ambiente d'avvio dalla interfaccia grafica di login.
Ma, se non abbiamo installato MATE su un Server già dotato di GUI abbiamo due vie: possiamo loggarci e lanciare manualmente x
startx
ad ogni avvio. Se non vogliamo loggarci e lanciare la GUI a mano ogni volta possiamo automatizzare il processo.
Eseguiamo il comando:
vim /etc/slim.conf
Ok, ma prima di procedere: cosa significa? Vim è un editor di testo e il comando precedente lo lancia per modificare il file di configurazione (slim.conf) che è presente nella directory /etc.
Quindi, andiamo a modificare le due voci default user ed auto login come in figura:


In pratica, scorrete il testo con le freccette fino a raggiungere il parametro:
#default_user simone
premete il tasto "canc" ed eliminate il cancelletto, poi spostatevi di fianco a simone, premete il tasto "ins" e sostituite l'utente di esempio simone con il vostro utente (nel mio caso il banale user).
default_user user
Così, al riavvio, vi troverete di fronte la schermata di login di MATE:

Se, invece, volete loggarvi automaticamente all'avvio della macchina (scelta sconsigliata) ripetete l'operazione su slim.conf per il parametro:
#auto_login no
che trasformerete in
auto_login yes
e, al riavvio vi ritroverete direttamente nell'ambiente grafico MATE.


Ovviamente, sia che scegliate lubuntu o MATE, gli ambienti desktop saranno davvero spartani e dovrete personalizzarli a seconda delle vostre esigenze.
Potreste installare il software da linea di comando ma suggerisco, per semplicità, di installare immediatamente il gestore grafico synaptic e usarlo per costruire il vostro ibrido Server-Desktop (o il vostro PC con GUI leggera) ideale.
Come si fa?
Facile: lanciate un terminale e...
sudo apt-get install synaptic
Dopodichè buon lavoro e buon divertimento.
and, depending on the amount of additional packages you want to install, you may or may not add mate-desktop-environment and mate-desktop-environment-extra to the setup command:
E', ovviamente, necessaria una gran quantità di software, quindi non vi allarmate per le dimensioni del download nè per l'alert sui pacchetti non firmati.
Quando l'installazione finisce è opportuno riavviare con il comando
reboot
Subito dopo il riavvio ci ritroveremo la solita scheramta testuale di login, se abbiamo installato MATE su una Ubuntu Server liscia, altrimenti, se abbiamo installato MATE su una Ubuntu Server già dotata di Lubuntu, per esempio, i passaggi successivi non sono necessari e si deve avere solo l'accortezza di selezionare MATE come ambiente d'avvio dalla interfaccia grafica di login.
Ma, se non abbiamo installato MATE su un Server già dotato di GUI abbiamo due vie: possiamo loggarci e lanciare manualmente x
startx
ad ogni avvio. Se non vogliamo loggarci e lanciare la GUI a mano ogni volta possiamo automatizzare il processo.
Eseguiamo il comando:
vim /etc/slim.conf
Ok, ma prima di procedere: cosa significa? Vim è un editor di testo e il comando precedente lo lancia per modificare il file di configurazione (slim.conf) che è presente nella directory /etc.
Quindi, andiamo a modificare le due voci default user ed auto login come in figura:
In pratica, scorrete il testo con le freccette fino a raggiungere il parametro:
#default_user simone
premete il tasto "canc" ed eliminate il cancelletto, poi spostatevi di fianco a simone, premete il tasto "ins" e sostituite l'utente di esempio simone con il vostro utente (nel mio caso il banale user).
default_user user
Così, al riavvio, vi troverete di fronte la schermata di login di MATE:
Se, invece, volete loggarvi automaticamente all'avvio della macchina (scelta sconsigliata) ripetete l'operazione su slim.conf per il parametro:
#auto_login no
che trasformerete in
auto_login yes
e, al riavvio vi ritroverete direttamente nell'ambiente grafico MATE.
Ovviamente, sia che scegliate lubuntu o MATE, gli ambienti desktop saranno davvero spartani e dovrete personalizzarli a seconda delle vostre esigenze.
Potreste installare il software da linea di comando ma suggerisco, per semplicità, di installare immediatamente il gestore grafico synaptic e usarlo per costruire il vostro ibrido Server-Desktop (o il vostro PC con GUI leggera) ideale.
Come si fa?
Facile: lanciate un terminale e...
sudo apt-get install synaptic
Dopodichè buon lavoro e buon divertimento.
English version
My previous article, dating back almost two years ago, on how to install a graphical user interface (GUI) to Ubuntu Server has had a more than moderate success with his 3850 views.
I thought it was appropriate to update the post with the new Ubuntu 14.04.
Progress is progress deployment and on the new Canonical's Ubuntu Server the task to install a graphical interface is certainly easier than two years ago.
Now, first of all a necessary premise: a Server with a graphical user interface is almost always unnecessary and harmful, and self quoting: 'there are few circumstances that make it really needed. The old adage: "what is not there can not break" which, in computer science, also has a nice corollary: "what is not there can not be violated." '
The procedure that follows may be useful to build a machine with Desktop interface that is lightweight and equipped with only the necessary software, or to a server that apart from being Server configured should also, for economic reasons, serve as a Workstation .
First: install Ubuntu 14.04 server adding only the ssh server role, in case you have other needs, of course, add all the needed roles when the installer asks you to.
After installation login on your server with your credentials and update the server:
sudo apt-get update
and, after the list of available software has been updated, launch the real update program:
sudo apt-get dist-upgrade
The quickest way to a Graphical User Interface passes for the installation of one of the many available desktop environments: Unity, KDE, XFCE LXDE.
To do this, we run one simple command:
sudo tasksel
entering the password. You will see this screen:
Here we select the desktop environment you prefer with darts and space bar, then hit enter.
I chose, for my test, Lubuntu in the minimal version.
There you have it: begin the download and installation of the software:
After a few minutes, depending on the power of the hardware, the speed of the internet connection and the desktop environment you choose, once the installation is complete we will be able to restart and find ourselves logged in a graphical environment.
And here is ubuntu 14.04 on a server with GUI and, in fact, the kernel server.
However, my favorite desktop environment, in these times is MATE:
is very light, full, does not require 3D acceleration and is highly customizable.
To install MATE 1.8, then, we will have to type in the terminal as follows:
However, my favorite desktop environment, in these times is MATE:
is very light, full, does not require 3D acceleration and is highly customizable.
To install MATE 1.8, then, we will have to type in the terminal as follows:
sudo -s (and enter your password)
echo "deb http://repo.mate-desktop.org/archive/1.8/ubuntu $(lsb_release -cs) main" | sudo tee /etc/apt/sources.list.d/mate-desktop.list
wget -qO - http://mirror1.mate-desktop.org/debian/mate-archive-keyring.gpg | sudo apt-key add -
apt-get update
and, depending on the amount of additional packages you want to install, you may or may not add mate-desktop-environment and mate-desktop-environment-extra to the setup command:
apt-get install xinit slim mate-core mate-desktop-environment mate-desktop-environment-extra mate-notification-daemon
is, of course, required a large amount of software, so do not be alarmed by the size of the download nor for the alert about unsigned packages.
When the installation ends you should restart with the command:
reboot
Immediately after the restart we will get the usual textual login, if we installed MATE on a plain Ubuntu Server, otherwise, if we installed MATE on a Ubuntu Server wich already has Lubuntu, for example, the next steps are not necessary and should only have the foresight to select MATE as a boot environment from GUI login.
But, if we do not have MATE installed on a server that already has the GUI we have two ways: we can either login and manually start x
startx
at every boot. If you do not want either login and launch the GUI by hand whenever we can automate the process.
Execute this command:
vim /etc/slim.conf
Ok, but before proceeding: what does it mean? Vim is a text editor and the command above launches it to change the configuration file (slim.conf) that is present in the / etc directory. So, let's modify the two entries as default user and auto login as below:
Practically, scroll through the text with the arrow keys until you reach the parameter:
#default_user simone
press the "delete" key and delete the hash mark, then move next to simone, press the "ins" and replace the sample user simone with your user (in my case the trivial user).
default_user user
So, when you restart, you will be facing the MATE login screen:
If, however, you want to just login automatically when the machine starts (not recommended) repeat the operation on slim.conf for the parameter:
#auto_login no
which will become
auto_login yes
and, on reboot you will end up directly in the MATE graphical environment .
Of course, whether you choose Lubuntu or MATE, the desktop environments will be very spartan and you have to customize them to suit your needs.
You may install the software from the command line but I suggest, for simplicity, to immediately install the synaptic package manager and use it to build your ideal hybrid Server-Desktop (or your PC with lightweight GUI).
How it works?
Easy: launch a terminal and ...
sudo apt-get install synaptic
Then good work and good fun.