Visualizzazione post con etichetta ubuntu. Mostra tutti i post

12 gennaio 2024

Pivpn su sistemi debian/ubuntu based non supportati - PiVPN for unsupported Debian/ubuntu derivatives


 PiVPN è un ottimo sistema per realizzare velocemente un server vpn domestico.

E a che serve?

Beh, fondamentalmente a collegarsi da remoto al pc di casa vostra.

Realizzare una vpn è una faccenda relativamente complessa e richiede un minimo di competenza anche usando PiVpn che è un software in grado di automatizzare il 95% delle attività di installazione e configurazione.

Ma quel 5% residuo (procurarsi un DNS dinamico, aprire le porte del router, definire un IP statico per il server ecc.) va fatto a mano. Il wizard di PiVpn è ben fatto ma non fa miracoli.

Tuttavia tra 100 e 5 c'è una bella differenza e un gran risparmio di tempo e fatica.

Personalmente, infatti, ho configurato più volte server VPN partendo da zero ed è un compito, ormai, più noioso che impegnativo e preferisco usare PiVpn e risparmiarmi la noia.

Ma c'è un problema:

PiVPN si installa solo e soltanto su 

Raspbian and Raspberry PI OS bastai su Debian Stretch, Buster e Bullseye. Su Ubuntu Server, DietPi e

Alpine Linux.

E le derivate di Debian/Ubuntu?

Beh, la documentazione dice che potrebbe funzionare ma loro non danno supporto in merito.

Di fatto, l'installer di PiVPN si rifiuta di proseguire se non rileva i sistemi operativi supportati ufficialmente.

E allora come si fa?

Ecco qua il trucchetto:

Per esempio, da Linux Mint è necessario modificare (momentaneamente) il file /etc/os-release come segue: dopo il setup si può rimettere tutto come stava prima. Su Mint 21.1 e LMDE6 poi PiVPN si installa e funziona perfettamente:


#NAME="Linux Mint"

#VERSION="21.2 (Victoria)"

#ID=linuxmint

#ID_LIKE="ubuntu debian"

#PRETTY_NAME="Linux Mint 21.2"

#VERSION_ID="21.2"

NAME="Ubuntu"

VERSION="22.04 (Jammy)"

ID=ubuntu

ID_LIKE="ubuntu debian"

PRETTY_NAME="Ubuntu 22.04"

VERSION_ID="22.04"

HOME_URL="https://www.linuxmint.com/"

SUPPORT_URL="https://forums.linuxmint.com/"

BUG_REPORT_URL="http://linuxmint-troubleshooting-guide.readthedocs.io/en/latest/"

PRIVACY_POLICY_URL="https://www.linuxmint.com/"

VERSION_CODENAME=victoria

UBUNTU_CODENAME=jammy


oppure, per LMDE


#PRETTY_NAME="LMDE 6 (faye)"

#NAME="LMDE"

#VERSION_ID="6"

#VERSION="6 (faye)"

#VERSION_CODENAME=faye

#ID=linuxmint

#HOME_URL="https://www.linuxmint.com/"

#SUPPORT_URL="https://forums.linuxmint.com/"

#BUG_REPORT_URL="http://linuxmint-troubleshooting-guide.readthedocs.io/en/latest/"

#PRIVACY_POLICY_URL="https://www.linuxmint.com/"

#ID_LIKE=debian

NAME="Debian"

VERSION="12"

DEBIAN_CODENAME=bookworm

ID=debian


Dopodiché, basta lanciare curl -L https://install.pivpn.io | bash da un terminale root e seguire il wizard. Ed il gioco è fatto: in pochi minuti avrete il vostro server vpn.


In Google Translator's English:


PiVPN is an excellent way to quickly create a home VPN server.

And what's the point?

Well, basically to connect remotely to your home PC.

Creating a VPN is a relatively complex matter and requires a minimum of expertise even using PiVpn which is software capable of automating 95% of installation and configuration activities.

But that remaining 5% (procuring a dynamic DNS, opening the router ports, defining a static IP for the server, etc.) must be done by hand. The PiVpn wizard is well done but doesn't work miracles.

However, between 100 and 5 there is a big difference and a great saving of time and effort.

Personally, in fact, I have configured VPN servers several times starting from scratch and it is now a task that is more boring than challenging and I prefer to use PiVpn and save myself the boredom.

But there's a problem:

PiVPN installs only and only on Raspbian and Raspberry PI OS based on Debian Stretch, Buster and Bullseye. On Ubuntu Server, DietPi and Alpine Linux.

What about Debian/Ubuntu derivatives?

Well, the documentation says it might work but they don't support it.

In fact, the PiVPN installer refuses to continue if it does not detect officially supported operating systems.

So how do you do it?

Here's the trick:

For example, from Linux Mint it is necessary to (temporarily) modify the /etc/os-release file as follows: after setup you can put everything back as it was before. On Mint 21.1 and LMDE6 then PiVPN installs and works perfectly:

#NAME="Linux Mint"

#VERSION="21.2 (Victoria)"

#ID=linuxmint

#ID_LIKE="ubuntu debian"

#PRETTY_NAME="Linux Mint 21.2"

#VERSION_ID="21.2"

NAME="Ubuntu"

VERSION="22.04 (Jammy)"

ID=ubuntu

ID_LIKE="ubuntu debian"

PRETTY_NAME="Ubuntu 22.04"

VERSION_ID="22.04"

HOME_URL="https://www.linuxmint.com/"

SUPPORT_URL="https://forums.linuxmint.com/"

BUG_REPORT_URL="http://linuxmint-troubleshooting-guide.readthedocs.io/en/latest/"

PRIVACY_POLICY_URL="https://www.linuxmint.com/"

VERSION_CODENAME=victoria

UBUNTU_CODENAME=jammy


and, for LMDE


#PRETTY_NAME="LMDE 6 (faye)"

#NAME="LMDE"

#VERSION_ID="6"

#VERSION="6 (faye)"

#VERSION_CODENAME=faye

#ID=linuxmint

#HOME_URL="https://www.linuxmint.com/"

#SUPPORT_URL="https://forums.linuxmint.com/"

#BUG_REPORT_URL="http://linuxmint-troubleshooting-guide.readthedocs.io/en/latest/"

#PRIVACY_POLICY_URL="https://www.linuxmint.com/"

#ID_LIKE=debian

NAME="Debian"

VERSION="12"

DEBIAN_CODENAME=bookworm

ID=debian


After that, just run curl -L https://install.pivpn.io | bash from a root terminal and follow the wizard. And that's it: in a few minutes you will have your VPN server.

27 settembre 2015

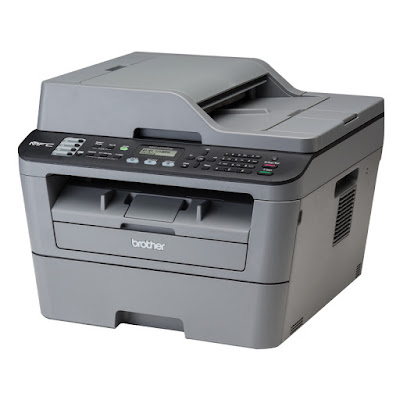
How to Install the Brother MFC-L2700DW printer/scanner in Debian/Ubuntu/Mint/Fedora


The Brother MFC-L2700DW is a very nice piece of hardware
Is a 26 ppm A4 B/W Laser Multifunction Printer, with automatic duplex, fax and scanner.
USB, LAN and WiFi connections.
Today, you can buy it on Amazon (Italy) at about € 120,00
Here there is the Borther product page.
Drum and toner are separate, an useful bonus in this class of printers.
The 2600 pages TN-2320 Toner Cartridge costs abut € 65,00.

Unfortunately, it is not possible to combine the wireless interface with the wired one, or does one or the other works. Not a big problem, but it could be useful in some scenarios.

The installation is not particularly difficult, but it's all from the command line so may be useful a little step by step procedure.

I am assuming that you have entered the IP address and the correct network parameters via LCD panel of the printer, for this operation the manual included in Documentation CD-ROM is very clear

Brother allows separate download for all the drivers components, but it is more practical to use the script provided which will download the updated deb / rpm and install the software prerequisites and dipendencies.

First, let's download the driver installer tool from the product download page which installs printer and scanner drivers

  1. Unzip the script: gunzip linux-brprinter-installer-2.0.0-1.gz
  2. make it executable: chmod a+x linux-brprinter-installer-2.0.0-1
  3. become root: sudo -s  or su if you use Fedora
  4. launch the script appending the Printer Product Name: bash linux-brprinter-installer-2.0.0-1 MFC-L2700DW
  5. the first output of the command is:
You are going to install following packages.
   mfcl2700dwlpr-3.2.0-1.i386.deb
   mfcl2700dwcupswrapper-3.2.0-1.i386.deb
   brscan4-0.4.3-1.amd64.deb
   brscan-skey-0.2.4-1.amd64.deb
OK? [y/N] ->


Press y and the installation will start. For purists, you must know that some of the drivers are not open source and you'll must  accept proprietary licenses.


The next steps of the installation require the acceptance of licenses and allowing the drivers download until you will be asked:

Will You Specify the Device URI? (Y/n)

to which, for network installations, you must press Y ( and N if you use the USB connection).

You will be offered a wide choice of options: press 9 and enter the IP address of the printer.

The installation will continue for the scanner and you must only accept licenses and downloads if you use Debian and derived, while if you use Fedora you'll have to re-enter the printer's IP.

The install will end soon after and a reboot is not strictly required.

What you can do now:

of course, print. Use Simple Scan Tool for scanning also via ADF.

What you will not be able to do:


  • send faxes from your PC;
  • Scan directly from scanner to PC by pressing using the printer buttons. (But I'm working on it ...)

Related Post for Brother MFC-7360N:

http://invernoerosa.blogspot.it/2012/06/installare-lo-scanner-della-brother-mfc.html

21 aprile 2014

Ubuntu Server 14.04 with GUI: the easy way, Lubuntu and/or MATE

In English (Google) at the bottom, but here the updated post for the 16.04

La guida aggiornata per Ubuntu 16.04 la trovate  qua.

Il mio precedente articolo, risalente ormai a due anni fa, su come installare una interfaccia grafica (GUI) ad Ubuntu Server ha avuto un più che discreto successo con le sue 3850 visualizzazioni.
Ho pensato che fosse il caso di aggiornare il post con la nuovissima Ubuntu 14.04.
Il progresso è il progresso e sulla nuova distribuzione server di casa Canonical installare una interfaccia grafica è senz'altro più semplice di due anni fa.
Ora, prima di tutto una premessa doverosa: un Server con Interfaccia grafica è quasi sempre inutile e dannoso e, autocitandomi: 'sono ben poche le circostanze che la rendono davvero necessaria. Vale il vecchio adagio: "Quello che non c'è non si rompe" che, nell'Informatica, ha anche un corollario mica da poco: "quello che non c'è non può essere violato".'
Il procedimento che segue potrebbe essere utile per costruire una macchina Desktop con interfaccia particolarmente leggera e dotata solo del software strettamente necessario oppure per un Server che oltre a fare da Server configurato come si deve debba anche, che so, per motivi economici, fungere da Workstation.
Per prima cosa, quindi, installate Ubuntu 14.04 server aggiungendo come ruolo solo quello di server ssh, nel caso abbiate altre necessità, ovviamente, aggiungete, quando l'installer ve lo richiede, tutti i ruoli necessari.
Dopo l'installazione logghiamoci sul server con le nostre credenziali,  aggiorniamo il server:

sudo apt-get update

e, dopo che l'elenco del software disponibile si è aggiornato lanciamo il vero e proprio programma di aggiornamento:

sudo apt-get dist-upgrade

La via più rapida ad una Graphical User Interface passa per l'installazione di uno dei numerosi ambienti grafici disponibili: Unity, KDE, XFCE LXDE. 
Per far ciò lanciamo un solo semplice comando:

sudo tasksel

inserendo la password. Comparirà questa schermata:


Selezioniamo l'ambiente desktop che preferiamo con freccette e barra spaziatrice e premiamo invio.
Io, per il mio test, ho scelto Lubuntu nella versione minima.
Il gioco è fatto: inizierà il download e l'installazione del software:


Dopo pochi minuti, a seconda della potenza dell'hardware, della velocità della connessione ad internet e dell'ambiente desktop scelto, una volta conclusa l'installazione potremo riavviare e ritrovarci a fare login in un ambiente grafico.


Ed ecco qui sopra un server ubuntu 14.04 con interfaccia grafica e, appunto, kernel server.


Tuttavia, il mio ambiente desktop preferito in questi tempi è MATE:
è leggerissimo, completo, non richiede accelerazione 3d ed è altamente customizzabile.
Per installare MATE 1.8, quindi, dovremo digitare nel terminale quanto segue:

sudo -s (e inserire la password)

echo "deb http://repo.mate-desktop.org/archive/1.8/ubuntu $(lsb_release -cs) main" | sudo tee /etc/apt/sources.list.d/mate-desktop.list

wget -qO - http://mirror1.mate-desktop.org/debian/mate-archive-keyring.gpg | sudo apt-key add -

apt-get update

e, a seconda della quantità di pacchetti aggiuntivi che si desidera installare, si potrà o meno aggiungere mate-desktop-environment  e mate-desktop-environment-extra al comando di installazione:

apt-get install xinit slim mate-core mate-desktop-environment  mate-desktop-environment-extra mate-notification-daemon


E', ovviamente, necessaria una gran quantità di software, quindi non vi allarmate per le dimensioni del download nè per l'alert sui pacchetti non firmati.


Quando l'installazione finisce è opportuno riavviare con il comando

reboot

Subito dopo il riavvio ci ritroveremo la solita scheramta testuale di login, se abbiamo installato MATE su una Ubuntu Server liscia, altrimenti, se abbiamo installato MATE su una Ubuntu Server già dotata di Lubuntu, per esempio, i passaggi successivi non sono necessari e si deve avere solo l'accortezza di selezionare MATE come ambiente d'avvio dalla interfaccia grafica di login.
Ma, se non abbiamo installato MATE su un Server già dotato di GUI abbiamo due vie: possiamo loggarci e lanciare manualmente x 

startx

ad ogni avvio. Se non vogliamo loggarci e lanciare la GUI a mano ogni volta possiamo automatizzare il processo.
Eseguiamo il comando:

vim /etc/slim.conf

Ok, ma prima di procedere: cosa significa? Vim è un editor di testo e il comando precedente lo lancia per modificare il file di configurazione (slim.conf) che è presente nella directory /etc.
Quindi, andiamo a modificare le due voci default user ed auto login come in figura:


In pratica, scorrete il testo con le freccette fino a raggiungere il parametro:

#default_user   simone


premete il tasto "canc" ed eliminate il cancelletto, poi spostatevi  di fianco a simone, premete il tasto "ins" e sostituite l'utente di esempio simone con il vostro utente (nel mio caso il banale user).

default_user   user

Così, al riavvio, vi troverete di fronte la schermata di login di MATE:


Se, invece, volete loggarvi automaticamente all'avvio della macchina (scelta sconsigliata) ripetete l'operazione su slim.conf per il parametro:

#auto_login no 

che trasformerete in

auto_login yes

e, al riavvio vi ritroverete direttamente nell'ambiente grafico MATE.


Ovviamente, sia che scegliate lubuntu o MATE, gli ambienti desktop saranno davvero spartani e dovrete personalizzarli a seconda delle vostre esigenze.
Potreste installare il software da linea di comando ma suggerisco, per semplicità, di installare immediatamente il gestore grafico synaptic e usarlo per costruire il vostro ibrido Server-Desktop (o il vostro PC con GUI leggera) ideale.
Come si fa?
Facile: lanciate un terminale e...

sudo apt-get install synaptic

Dopodichè buon lavoro e buon divertimento.


English version


My previous article, dating back almost two years ago, on how to install a graphical user interface (GUI) to Ubuntu Server has had a more than moderate success with his 3850 views.
I thought it was appropriate to update the post with the new Ubuntu 14.04. 
Progress is progress  deployment and on the new Canonical's Ubuntu Server the task to install a graphical interface  is certainly easier than two years ago.
Now, first of all a necessary premise: a Server with a graphical user interface is almost always unnecessary and harmful, and self quoting: 'there are few circumstances that make it really needed. The old adage: "what is not there can not break" which, in computer science, also has a nice corollary: "what is not there can not be violated." '
The procedure that follows may be useful to build a machine with Desktop interface that is lightweight and equipped with only the necessary software, or to a server that apart from being Server configured should also, for economic reasons, serve as a Workstation .
First: install Ubuntu 14.04 server adding only the ssh server role, in case you have other needs, of course, add  all the needed roles  when the installer asks you to. 

After installation login on your server with your credentials and update the server:

sudo apt-get update

and, after the list of available software has been updated, launch the real update program:

sudo apt-get dist-upgrade

The quickest way to a Graphical User Interface passes for the installation of one of the many available desktop environments: Unity, KDE, XFCE LXDE. 
To do this, we run one simple command:

sudo tasksel

entering the password. You will see this screen:


Here we select the desktop environment you prefer with darts and space bar, then hit enter. 
I chose, for my test,  Lubuntu in the minimal version. 
There you have it: begin the download and installation of the software:


After a few minutes, depending on the power of the hardware, the speed of the internet connection and the desktop environment you choose, once the installation is complete we will be able to restart and find ourselves  logged in a graphical environment.


And here is ubuntu 14.04 on a server with GUI and, in fact, the kernel server. 


However, my favorite desktop environment, in these times is MATE: 
is very light, full, does not require 3D acceleration and is highly customizable. 
To install MATE 1.8, then, we will have to type in the terminal as follows:

sudo -s (and enter your password)

echo "deb http://repo.mate-desktop.org/archive/1.8/ubuntu $(lsb_release -cs) main" | sudo tee /etc/apt/sources.list.d/mate-desktop.list

wget -qO - http://mirror1.mate-desktop.org/debian/mate-archive-keyring.gpg | sudo apt-key add -

apt-get update

and, depending on the amount of additional packages you want to install, you may or may not add mate-desktop-environment and mate-desktop-environment-extra to the setup command:

apt-get install xinit slim mate-core mate-desktop-environment  mate-desktop-environment-extra mate-notification-daemon


is, of course, required a large amount of software, so do not be alarmed by the size of the download nor for the alert about unsigned packages.


When the installation ends you should restart with the command:

reboot

Immediately after the restart we will get the usual textual login, if we  installed MATE on a plain Ubuntu Server, otherwise, if we installed  MATE on a Ubuntu Server wich already has Lubuntu, for example, the next steps are not necessary and should only have the foresight to select MATE as a boot environment from GUI login. 
But, if we do not have MATE installed on a server that already has the GUI we have two ways: we can either login and manually start x

startx

at every boot. If you do not want either login and launch the GUI by hand whenever we can automate the process. 
Execute this command:

vim /etc/slim.conf

Ok, but before proceeding: what does it mean? Vim is a text editor and the command above launches it to change the configuration file (slim.conf) that is present in the / etc directory. So, let's modify the two entries as default user and auto login as below:


Practically, scroll through the text with the arrow keys until you reach the parameter:

#default_user   simone

press the "delete" key and delete the hash mark, then move next to simone, press the "ins" and replace the sample user simone with your user (in my case the  trivial user).

default_user   user

So, when you restart, you will be facing the MATE login screen:


If, however, you want to just login automatically when the machine starts (not recommended) repeat the operation on slim.conf for the parameter:

#auto_login no 

which will become

auto_login yes

and, on reboot you will end up directly in the MATE graphical environment .


Of course, whether you choose Lubuntu or MATE, the desktop environments will be very spartan and you have to customize them to suit your needs. 
You may install the software from the command line but I suggest, for simplicity, to immediately install the synaptic package manager and use it to build your ideal hybrid Server-Desktop (or your PC with lightweight GUI). 
How it works? 
Easy: launch a terminal and ...

sudo apt-get install synaptic

Then good work and good fun.

27 maggio 2013

Lubit

Oggi parliamo di Lubit.

Cos'è?
Una distro tutta italiana derivata da Ubuntu e dedicata a vecchio hardware o PC poco potenti.


E' una live.
Il sito di riferimento è questo, ma al momento in cui scrivo non è ancora pronto ma potete scaricare il software da qui.
Al momento, l'installazione avviene attraverso una iso di circa 880 MB nella sola versione a 32 bit.
E' una distro live, con credenziali di accesso predefinite utente lubit e password vuota.
Il caricamento è praticamente istantaneo su macchina virtuale.
E' necessario leggere le note di rilascio per accedere all'installer che viene lanciato dal Desktop
.

L'installer è quello classico di Ubuntu, chiaro, semplice e veloce.
All'avvio la mia macchina virtuale di test occupa solo 85 Mb su 1 GB.
Ho proceduto ad effettuare gli aggiornamenti


Interessante, poi, la lista dei repository scelti dagli ideatori della distribuzione:


Il sistema è abbastanza completo di suo: chromium come browser ed il leggero abiword invece di libreoffice.
Nel caso, via synaptic è possibile aggiugnere altro software.
Ho provato ad installare VLC con successo, ma si deve ricorrere all'aggiunta manuale al menu del collegamento all'eseguibile. Nessun problema per gli utenti esperti, ma per i neofiti non sarebbe proprio immediato


Insomma, tirando le somme è un piacere poter usare una distro tutta italiana basata sul leggero razionae e completo desktop environment Openbox. 
Congratulazioni agli sviluppatori, il loro progetto occupa una nicchia precisa e necessaria tra le derivate di ubuntu.
Se avete una macchina vecchiotta o un netbook questa distro è fatta per voi, leggerissima, scalabile e completa.
In una parola: LINUX

19 ottobre 2011

I and Linux: a Love Story

Dear English readers, I translated the post by Google Translator, you can found it at the bottom...

Ho incontrato Linux per la prima volta alla metà degli anni '90 al LAIB 2 del Politecnico di Torino.
Allora i computers, i286 ed i386, giravano con Dos e Windows 3. 
Quel computer mi attirò subito: era diverso dagli altri.
Purtroppo era anche il computer del responsabile dell'aula ed avvicinarsi era praticamente impossibile.
Un paio di anni dopo, grazie alla meritoria iniziativa "Un Computer in Ogni Casa", mi riuscì di acquistare un pc dotato del mitico processore AMD Thunderbird per affiancare il mio vecchio 486. Una belva di macchina, per l'epoca, quella CPU. Spinta fino alla follia, si bruciava in un secondo in caso di rottura della ventola ( non aveva il diodo di sicurezza ). Ovviamente, il bando della regione imponeva la presenza di un sistema operativo originale. Ed io pensai bene di risparmiare un bel po' di denaro usando linux.
Da escamotage formale, la cosa si trasformò in un evento epocale.
Così, un bel giorno, mi ritrovai in stanzetta con il mio pc nuovo nuovo, un modem 56k esterno su porta com ( ancora perfettamente funzionante ) ed una serie di Floppy Disk contenenti una versione di Mandrake Linux di cui non ricordo il numero.
E fu amore.


Riuscii a configurare al primo colpo anche il modem.
Non fu un amore travolgente, ma una passione dell'anima.
Dopo Mandrake provai Fedora 2, poi 3, poi 4 e con Fedora 5 ricordo di esser riuscito a sostituire per la prima volta completamente Windows su un PC lavorativo.


Da allora non mi sono più fermato.
Attorno alla seconda metà degli anni zero sono passato a Debian ed Ubuntu, ma ho potuto apprezzare anche le distribuzioni specializzate come Ipcop, Endian, FreeNas ( che se non erro è BSD però ) e persino Opensuse, per non parlare di quelle di nicchia come Pardus Linux. Ho usato Gnome, KDE ed altri ambienti grafici a seconda dei miei gusti e delle mie necessità.


A dieci anni di distanza  ho solo il rammarico di non aver seguito completamente questa passione, magari ora le cose sarebbero state diverse.
L'anno scorso, in occasione del quarto Linux Day, sono riuscito a migrare il mio PC fisso a linux. Quest'anno, complici la mia maggiore esperienza e la migliorata qualità del software, sono riuscito a migrare tutti i miei sistemi ( aspetti ludici a parte ) a Linux, compreso il portatile HP che avevo recentemente formattato con windows.
E' stato un lungo cammino che analizzo per la prima volta in questi termini.
Linux mi ha dato tante opportunità professionali.


Mi ha consentito di ripristinare reti infette da virus con un piccolo netbook da duecento €.
Mi ha consentito di lavorare in condizioni in cui le macchine windows smettono di funzionare, di recuperare dati, di lavorare dalle tendopoli, di portare il web a persone che non avrebbero potuto permettersi l'acquisto di un nuovo pc figuriamoci le licenze di windows. Mi ha consentito di non essere più stressato da richieste di supporto tecnico continuo da parte di amici e parenti che ho fatto migrare da windows a linux. Mi ha consentito di essere padrone della mia vita digitale in libertà e consapevolezza: quando qualcosa va storto, in genere, io so cosa va storto, con Linux. E non dipendo più dai capricci delle multinazionali del settore.
Oggi, posso scegliere.
Ma l'evoluzione tecnica di questa storia è nulla se confrontata al contributo umano che Linux ha portato alla mia vita.
Non solo attraverso le persone incontrate online da cui ho prima imparato e a cui ho, dopo, prestato soccorso.


Ricordo ancora la chiacchierata in Bottega che ha portato a queste cinque splendide esperienze che sono state i Linux Day materani. "Ah, tu dici ai ragazzi che usare Linux è il modo scout di usare il computer?" E ricordo i volti, le voci, la fatica condivisa, la soddisfazione di discutere e non chiacchierare, confrontarsi e non competere per l'ultima parola, la certezza di aver contribuito ad un progresso vero per tutti lontano dalla sterile malattia del parlare a vanvera. Tutte queste cose e, soprattutto,  le amicizie preziose e forti che Linux mi ha consentito di creare non sono altro che la cartina di tornasole dell'eticità e bontà di tutto il progetto, un colossale progetto di condivisione della conoscenza in cooperazione ed armonia. Grazie, Linux, hai cambiato la mia vita e quella di chi mi sta intorno. Grazie alla Comunità di Materalinux e buon Linux Day 2011 a tutti.

In (bad, sorry) English:


I met with Linux for the first time in the mid 90s to LAIB 2 of the Turin Polytechnic.
Then, the computers, i286 and i386, went around with DOS and Windows 3.
That computer drew me immediately: it was different from others.
Unfortunately it was of the System Administrator of the computer classroom and approach was virtually impossible.
A couple of years later, thanks to the commendable initiative "A Computer in Every Home" by local government of Basilicata, I was able to buy a PC with the mythical AMD Thunderbird to work alongside my old 486. A beast of machine, for the time, the CPU, driven to madness,  burned in a second in case of breakage of the fan (did not have the safety diode device). Obviously, the announcement of the Government of Basilicata required the presence of a qualifying operating system. And I thought well save you a lot of money by using Linux.
From a formal trick, it became a landmark event.
So, one day, I found myself in a room with my new pc, a 56k external modem on com port (still fully functional) and a series of floppy disk containing a version of Mandrake Linux of wich i can not remember the number.
It was love.
I managed to configure the modem the first time also.
There was an overwhelming love, and a passion of the soul.
After, I tried Mandrake Fedora 2, then 3, then 4 and Fedora 5 with memories of being able to substitute completely for the first time on a Windows business PC.
Since then I have not stopped.
By the second half of the noughties I switched to Debian and Ubuntu, but I could appreciate the specialized distributions like IPCop, Endian, FreeNAS (BSD is that if I am mistaken though) and even openSUSE, not to mention those niche as Pardus Linux. I used Gnome, KDE, Mate, Cinammon and other desktop environments according to my tastes and my needs.
I was able to restore virus infected networks with a small netbook for two hundred €. It has enabled me to work in conditions where the windows machines stoppped working, to retrieve data, I worked from tent cities, to bring the web to people who could not afford to buy a new pc with windows licenses. I was not allowed to be more stressed by ongoing technical support requests from friends and relatives who have migrated from windows to linux. It has enabled me to be master of my digital life in freedom and awareness: when something goes wrong, in general, I know what goes wrong with Linux. And no longer depend on the whims of the multinationals.
Today, I can choose.
But the technical evolution of this story is nothing compared to the human contribution to Linux has brought to my life.
Not only through the people from whom I first encountered online and I learned, later rescued.
I still remember the talk in the workshop that led to these five wonderful experiences that have been the Linux Day Matera. "Ah, you say to kids who use Linux is the way scouts to use the computer?" And I remember the faces, voices, shared the toil, the satisfaction of talk and not talk, meet and do not compete for the final word, be sure to have contributed to real progress for all away from the sterile disease of waffling. All these things and, above all, strong and valuable relationships that Linux has allowed me to create are nothing more than a litmus test of ethics and goodness of the whole project, a massive project of knowledge sharing in cooperation and harmony. With Linux, you changed my life and the lives of those around me. Thanks to the communityand good Materalinux Linux Day 2011 to all.